cloup
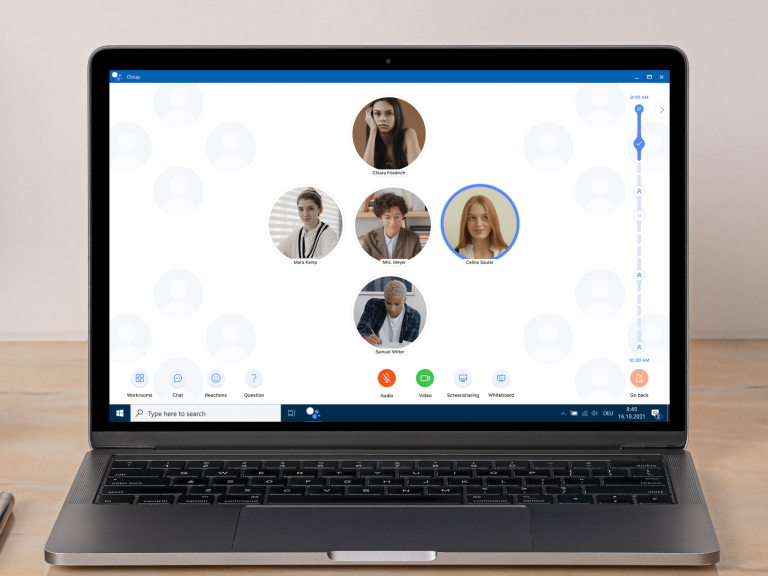
The new way of online group work.
Cloup is an online meeting platform that was specially developed to optimize students' group work and workshops.
Time
2021/2022
Client/Setting
Bachelor thesis interaction design
Tools
Figma, Adobe Illustrator, Adobe Photoshop, Adobe Premiere Pro, Adobe After Effects
Credits
Maren Schlatter
Role
Research, Interviews, Ideation, Concept, UX Design, Prototyping, Visual design, Video editing
Concept summary
Our bachelor's thesis was developed during the corona pandemic. It became clear that online teaching, which was necessary during the pandemic, does not work like face-to-face teaching.
With the support of our cooperation partner TeamViewer AG from Göppingen and their product TeamViewer Classroom, we came across the problem of the incomprehensible and unintuitive use of meeting tools in the school environment. The market for meeting tools is large, but none of them really meet the needs of students and teachers.
Research
At the beginning of our bachelor's project, we carried out a six-day design sprint. After the sprint, we deepened our research with critical questions, interviews with experts and teachers as well as high school students. In order to become familiar with our user group and their problems, we create an online survey. We send it to our affected user group via social media platforms. A total of 30 teachers from different German-speaking countries participated in our online survey. We also carried out extensive market research in order to position ourselves.
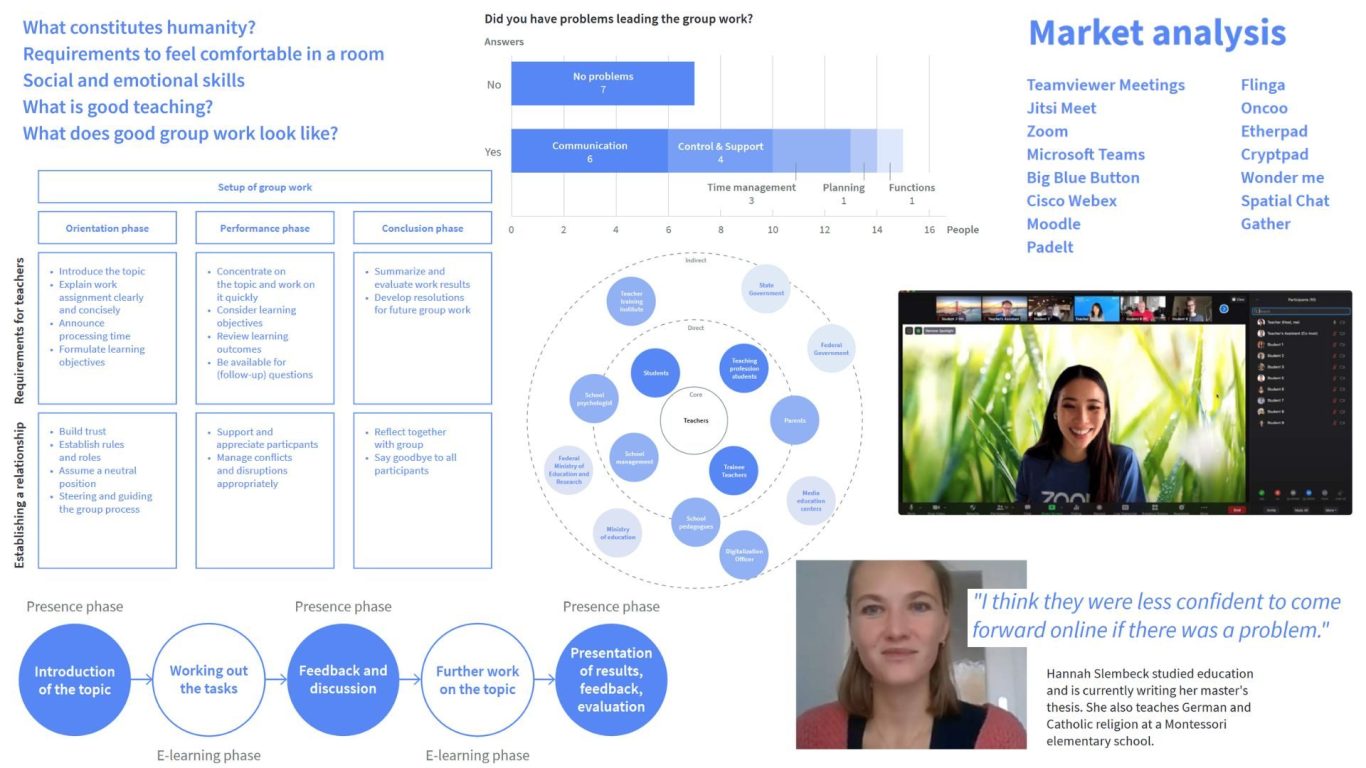
Research excerpts
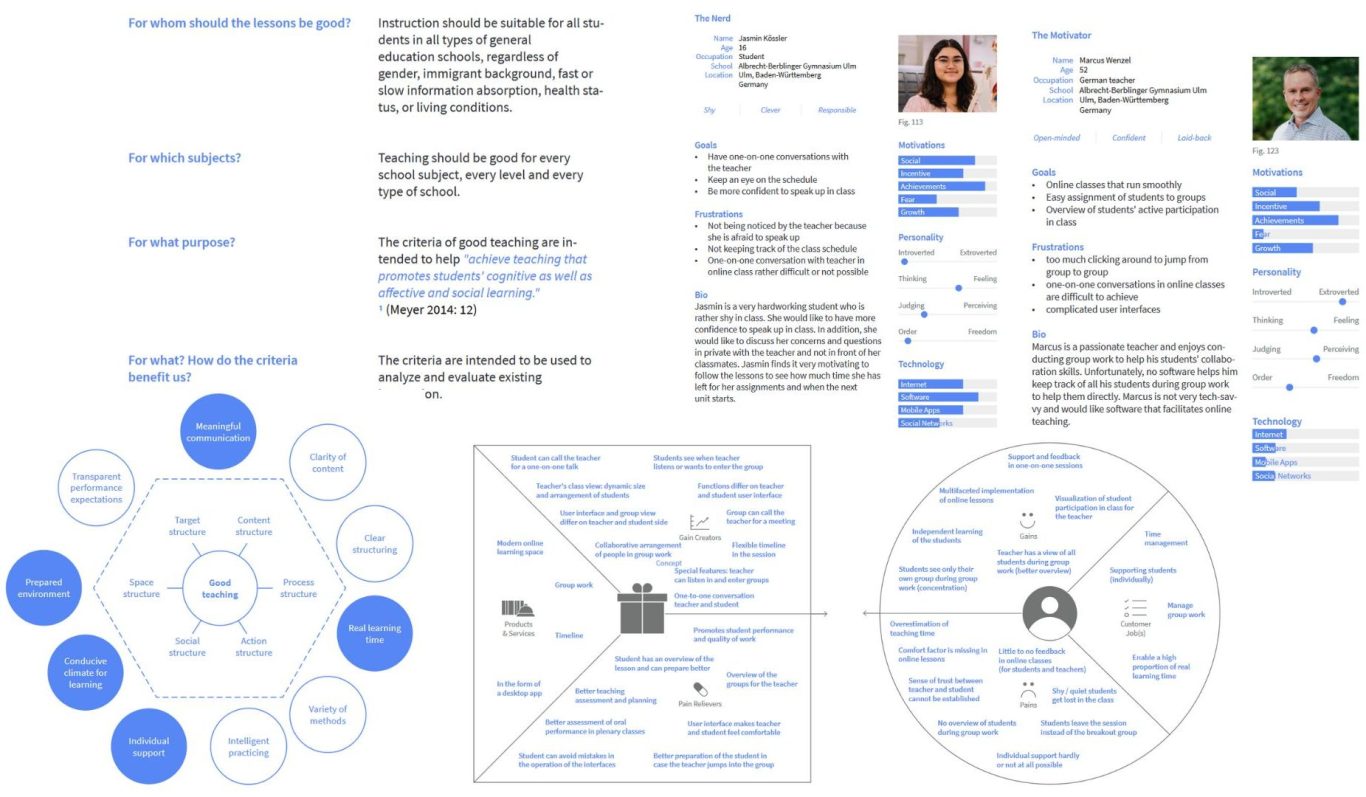
Ideation
In the ideation phase, we used the Question Zero method to clarify the most important questions. We took a close look at Hilbert Meyer's Ten criteria of good teaching, created personas and drew up a business model canvas.
How might we...?
Individual support
...
ensure individualized support for each student within online group/single work phases, so we can guarantee better learning outcomes for
each student?
...
visually alert the teacher that a student needs help so we can ensure
that no student is left behind?
Efficiency
...
ensure that students can work together on assignments in homeschooling so that we can encourage active participation in online lessons.
...
ensure that teachers keep track of all students although they are working in groups so we can guarantee that the teacher can provide help where
it is needed?
...
visualize the students' progress in class so that we can allow them to
organize themselves within groups?
...
organize online partner/group work efficiently so that we can have structured, time-saving lessons without interruptions?
...
visualize the presentation of completed tasks in group work phases so that we can discuss the results in front of the whole class?
Collaboration
Concept
For the final prototype, we developed four use cases that represent the core functions of the application.
We developed each use case from two different perspectives, as the functions of both users differ.
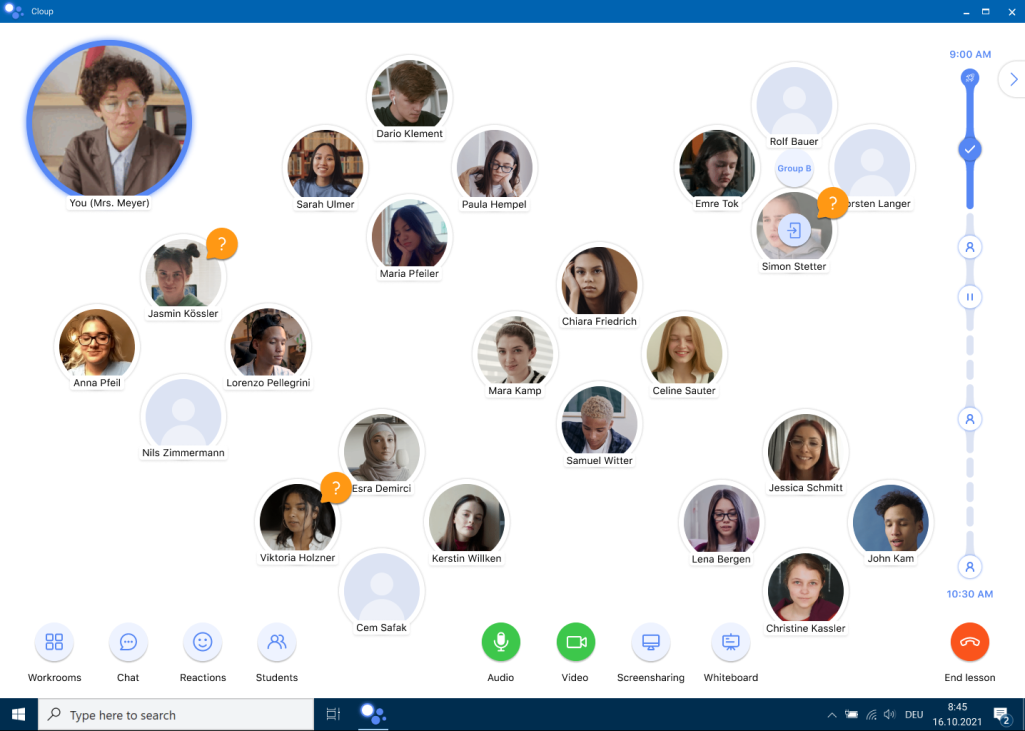
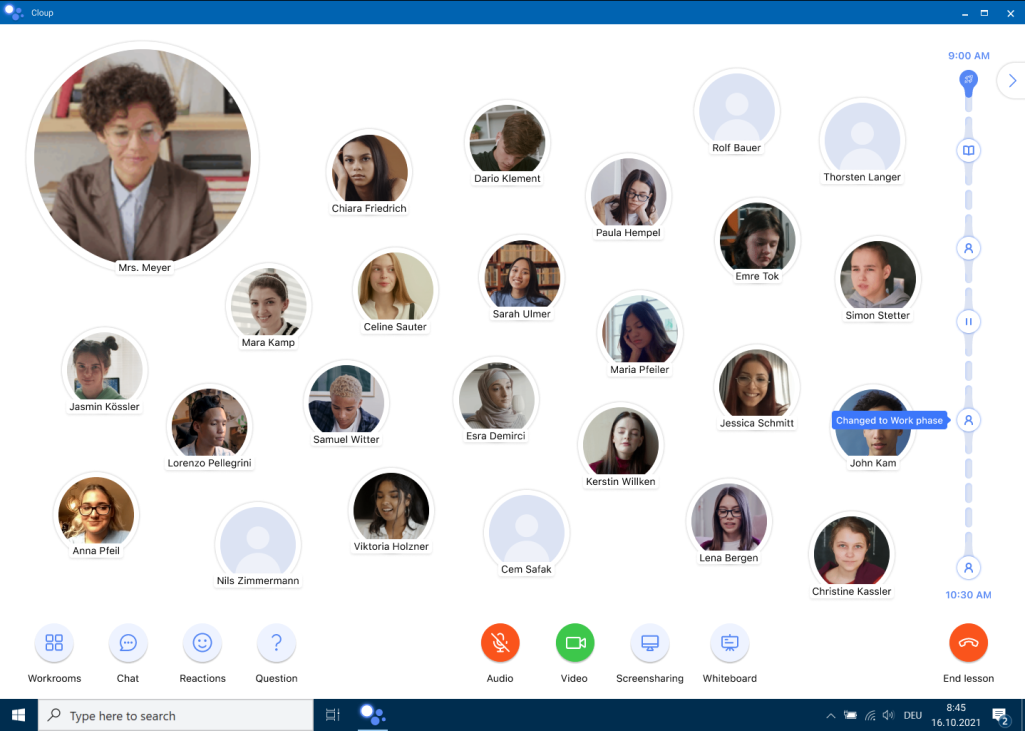
Teachers' application
Editing and processing the timeline
The teacher is in the classroom. The enlarged and consistent views of the students allow the teacher to see exactly who has already contributed to the lesson.
To change phases within the timeline function during the lesson, the teacher can expand and collapse the timeline as required. After expanding the timeline on their user interface, they can decide which phases should be changed, deleted or added.
The teacher then deletes a phase and adds a new one by clicking on the timeline and selecting the desired new phase. If the teacher wants to move a phase, the times within the hover-enabled tiles are automatically adjusted. The teacher is able to label the tiles of a phase independently.
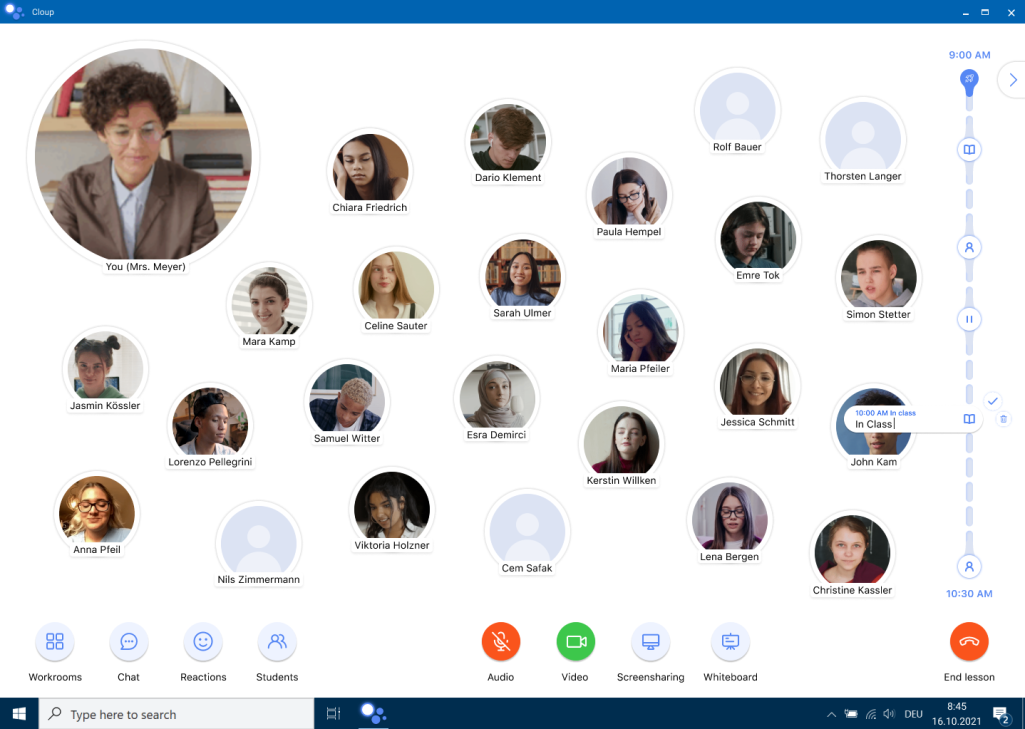
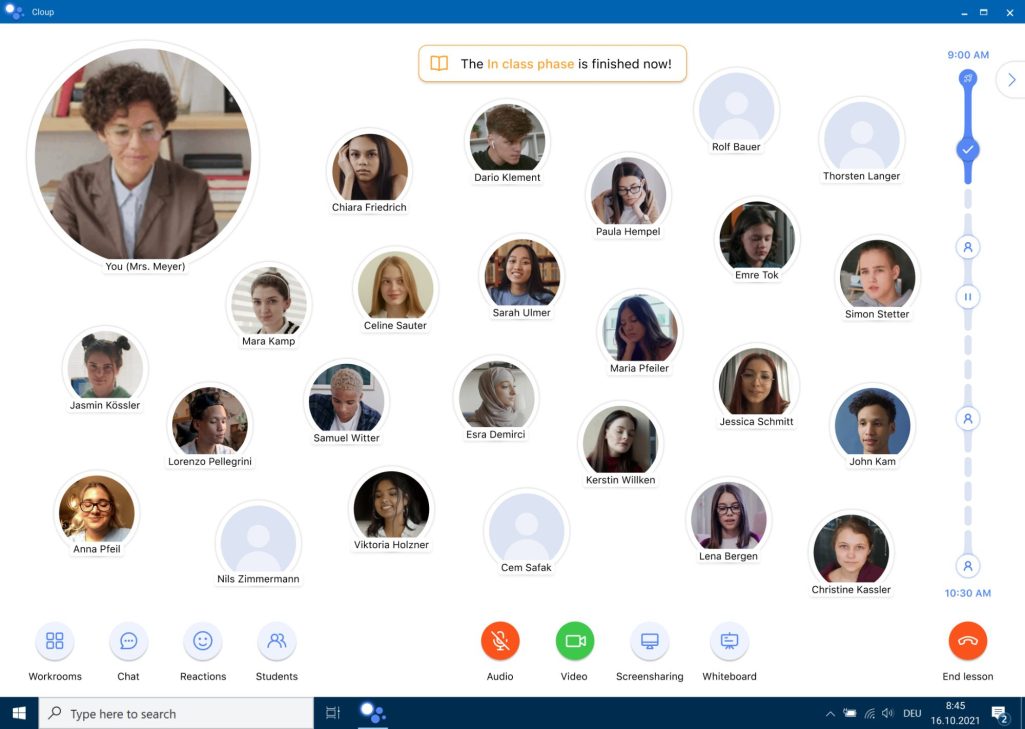
After a phase has ended, both the teacher and the students receive an acoustic notification indicating the end of a phase. The timeline changes visually during the online lesson. Completed phases are marked with a tick.
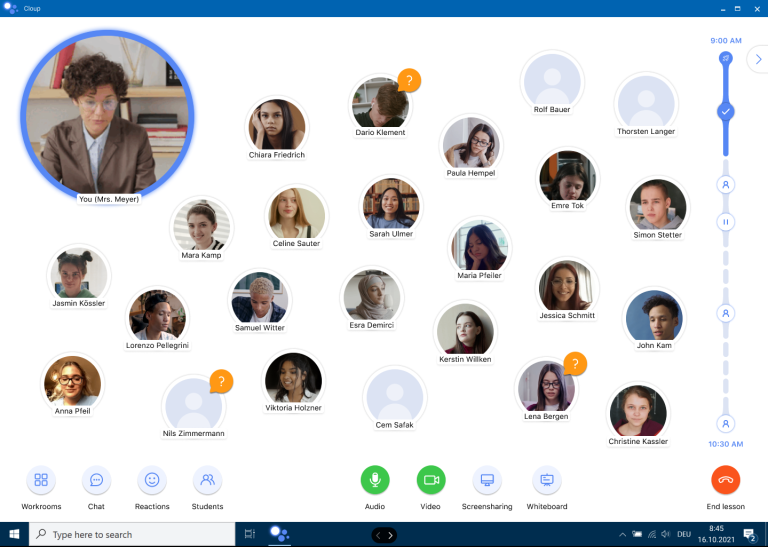
Individual support in class
The teacher explains a topic and notices through visual and auditory cues that her students have questions. She begins a one-on-one conversation with the students, who describe their problems and share their screen. Together they clarify the issue, after which the teacher and the student return to the class.
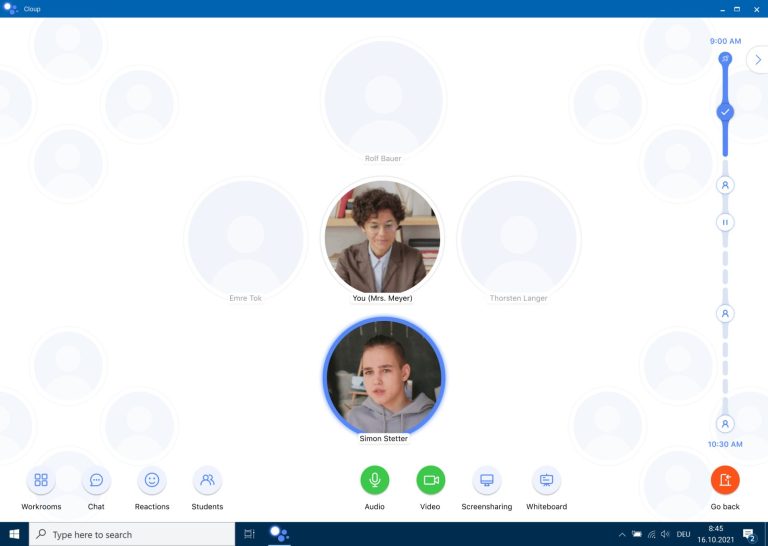
Individual support in groups
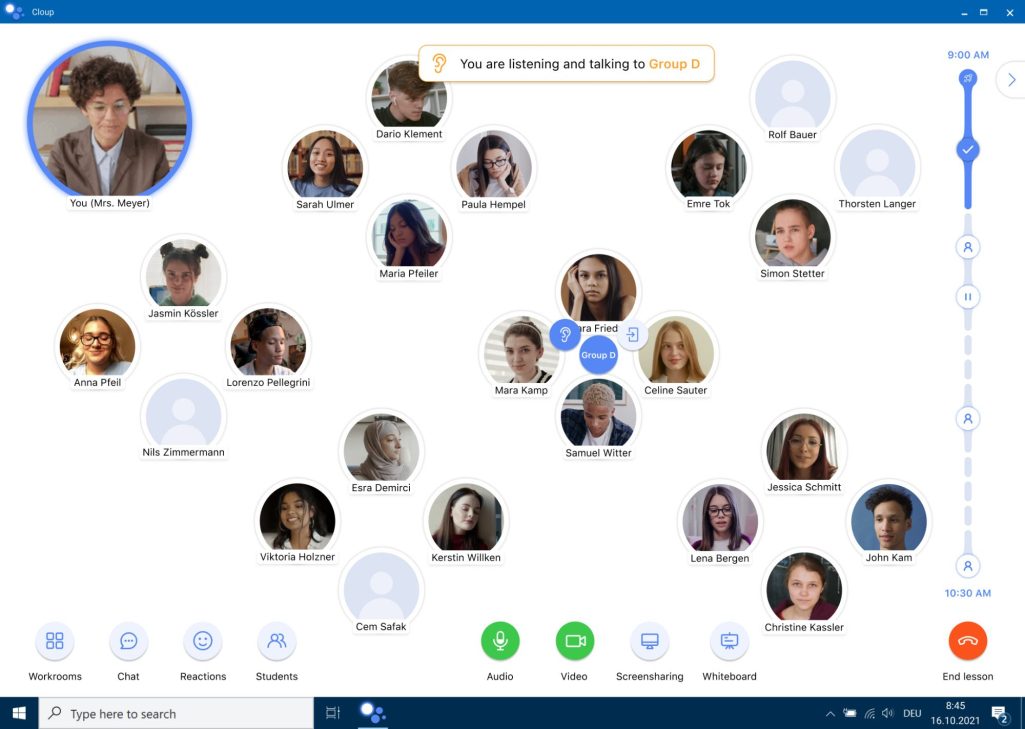
The teacher divides the students into groups and can now visually see which student is in which group. The groups were named by the teacher in the workspace. While explaining a topic, the teacher speaks to all groups and notices through visual as well as auditory cues that her students have questions.
She switches to group D, in which she only sees Simon, who has asked the teacher for help. Simon wants the teacher to include another student in the group discussion. The teacher adds Emre to the conversation.
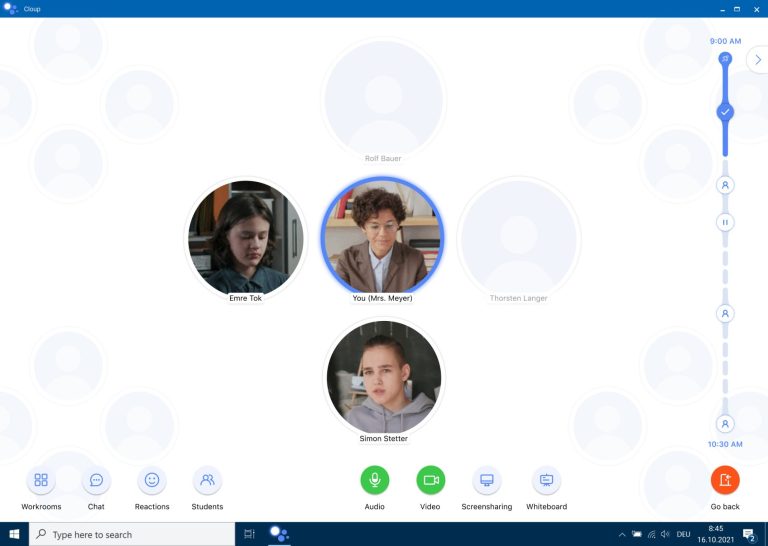
Emre starts talking and sharing his screen. Simon and Emre are happy they received feedback from the teacher. She leaves the group and returns to the overview of all groups.
Conducive learning environment
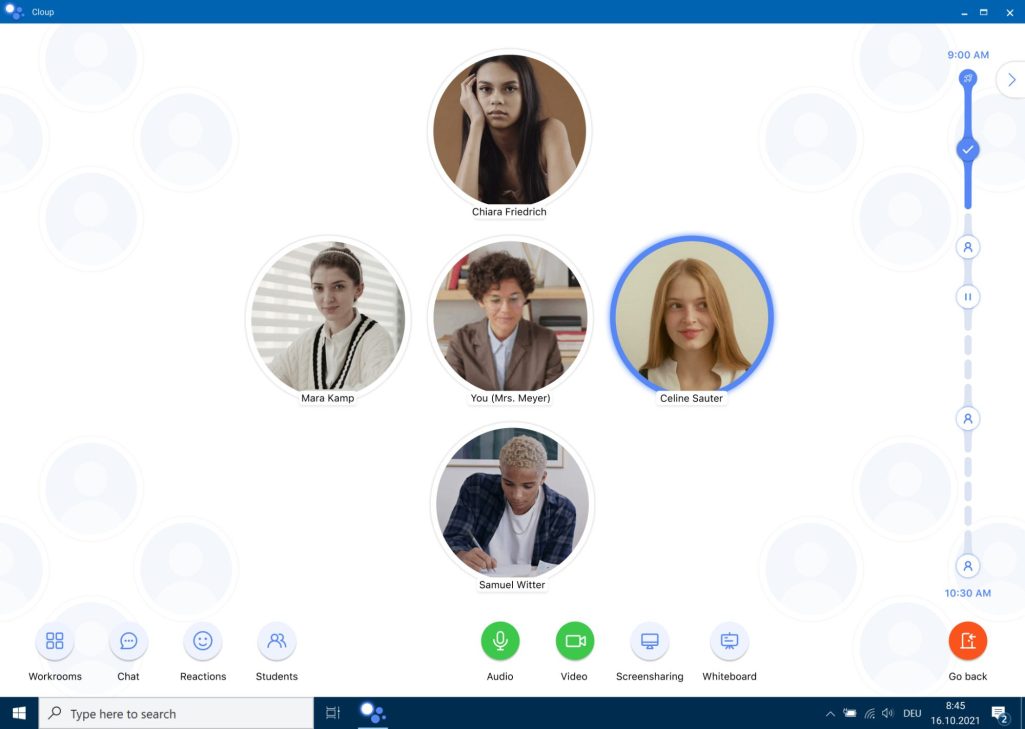
The teacher divides the students into groups and can now visually see which student is in which group. The groups have been named by the teacher in the workrooms.
The teacher first speaks to all groups and then mutes herself so that the students can work independently on the tasks in their groups. During group work, the teacher listens in on a group to monitor progress. She then starts talking to the group to make sure everything is going smoothly. The students answer her.
The teacher wants to join the group. She leaves the group after watching for a while and returns to the group overview.
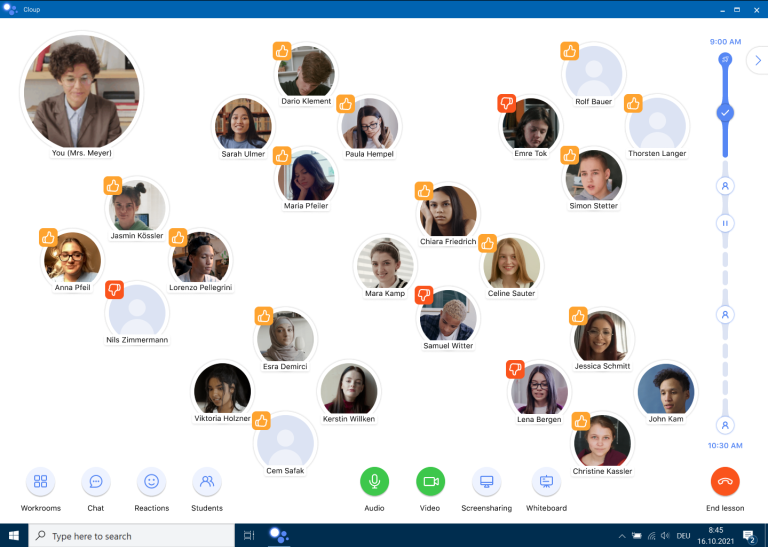
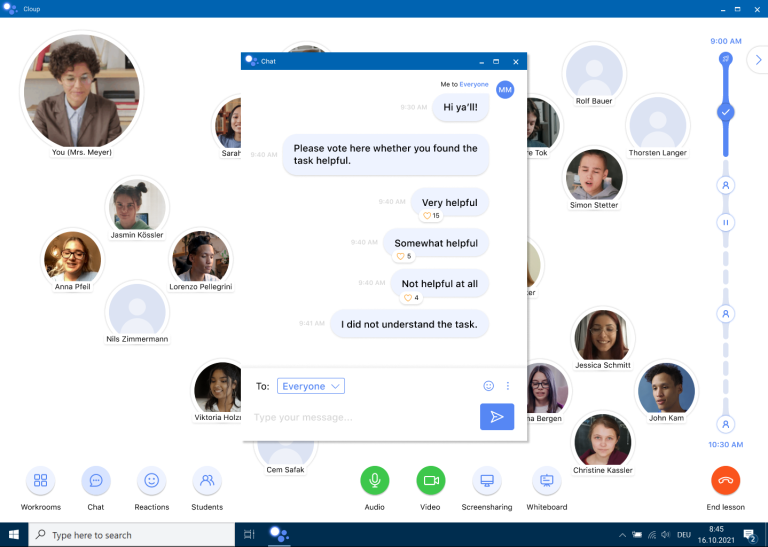
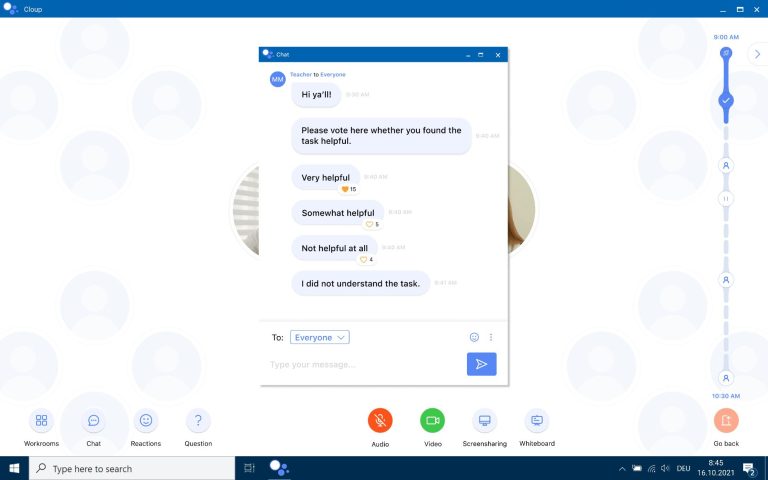
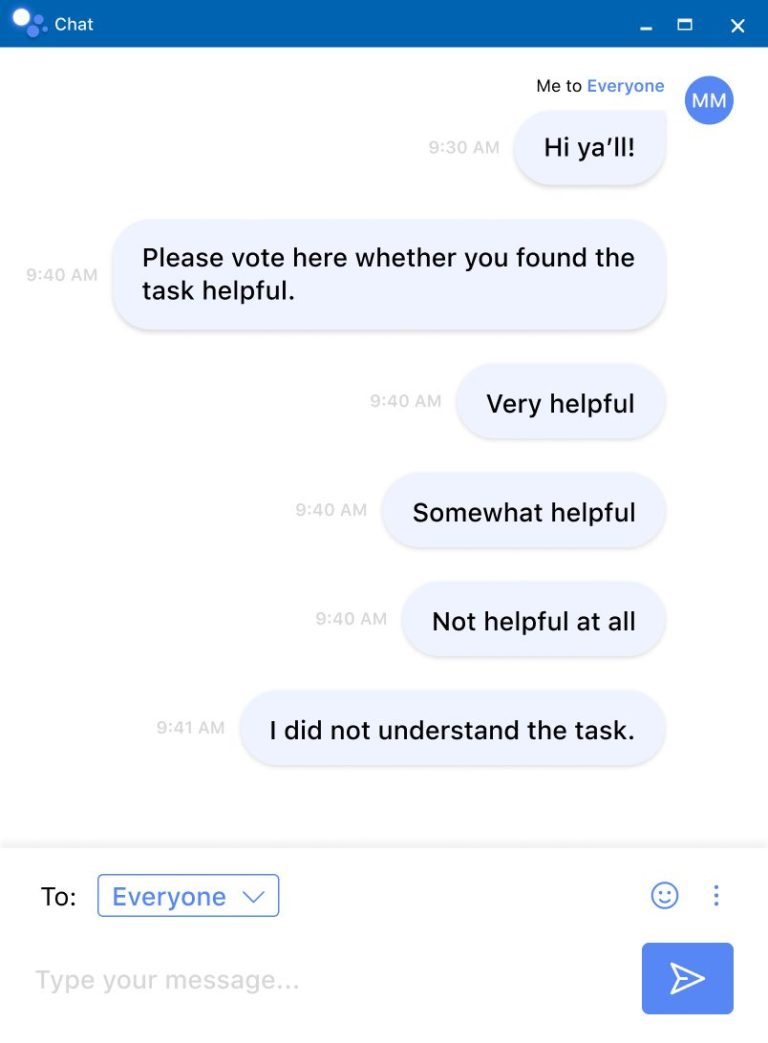
The teacher speaks to the whole class and receives reactions from the students. She creates a survey. To do this, she writes in the chat, after which the students rate her messages positively.
Students' application
Editing and customizing the timeline
Students in class can expand or collapse the timeline as required. After expanding the timeline on their user interface, they are able to see the different phases of the lesson.
If the teacher changes the time or the name of certain phases in the timeline, the student receives a visual notification in the form of a tooltip.
Individual phases can be controlled with the cursor and display a description of the respective tile. After completing a phase, both the teacher and the students receive a visual and acoustic notification about the end of the phase.
The timeline changes visually during the online lesson. Phases that have been completed are marked with a tick.

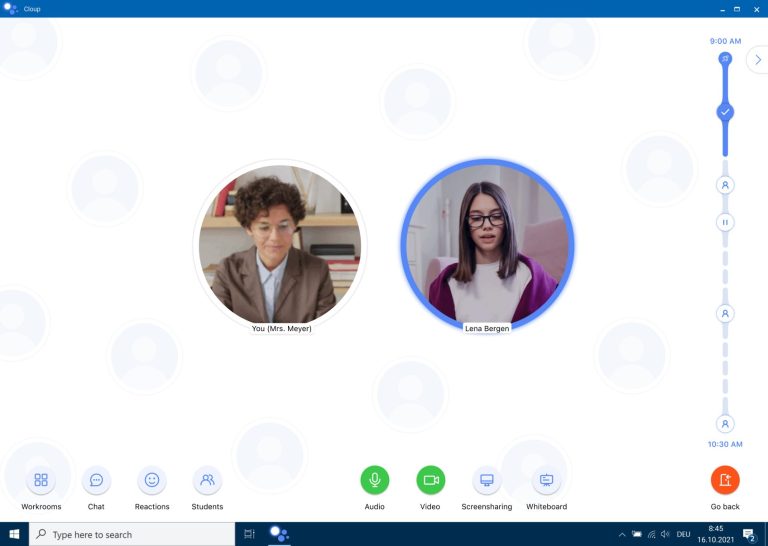
Individual support in class
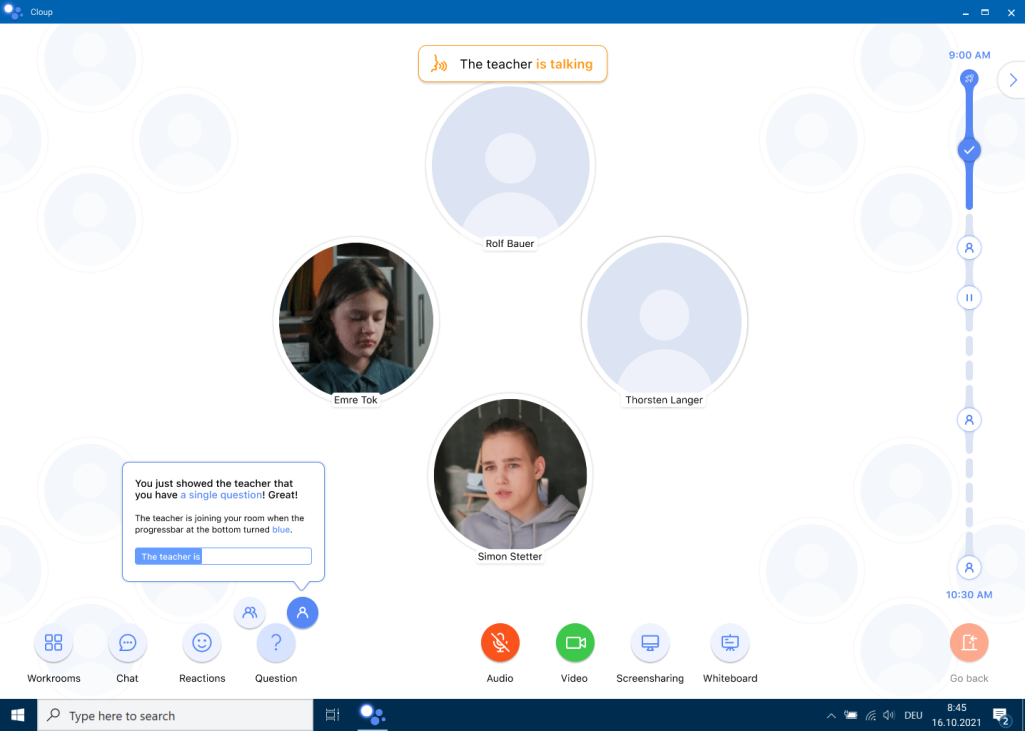
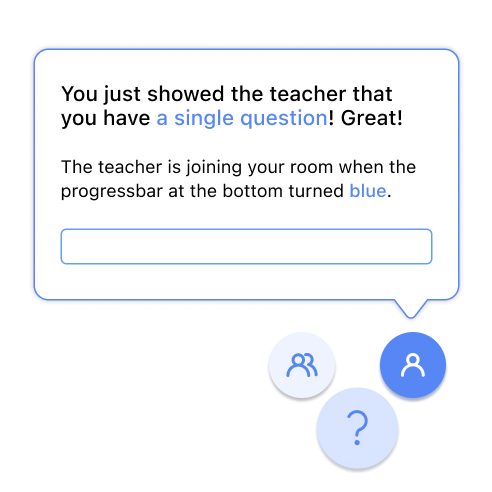
The student uses the question function to indicate to the teacher that she has a question. As soon as the bar in the tooltip is filled, the student enters into a one-to-one conversation with the teacher.
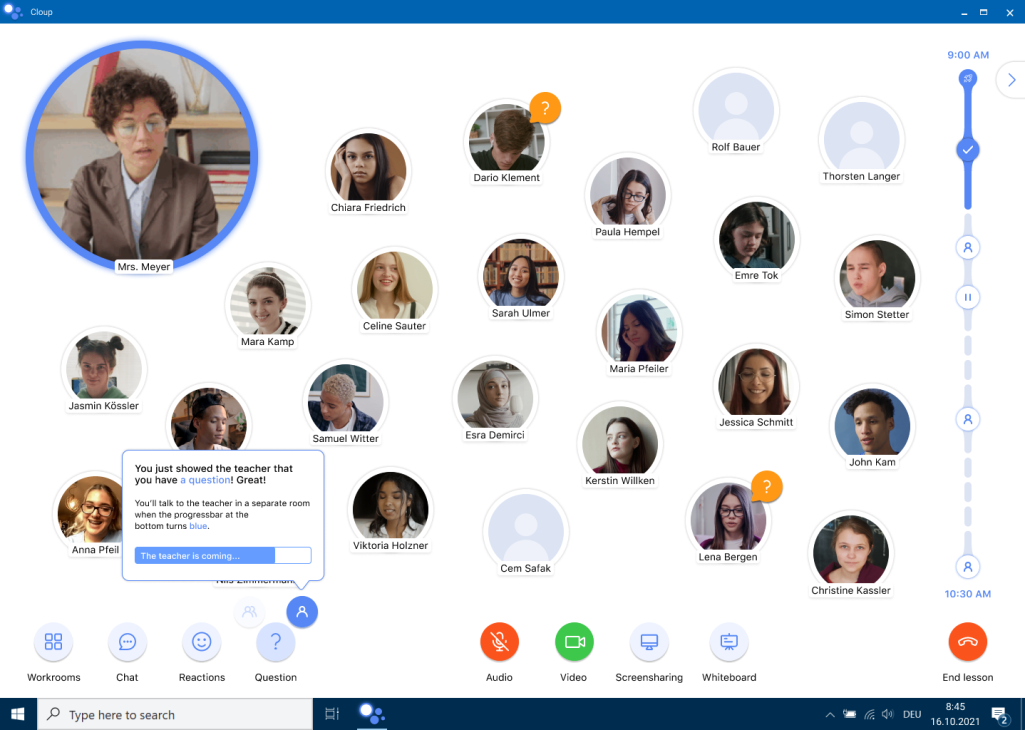
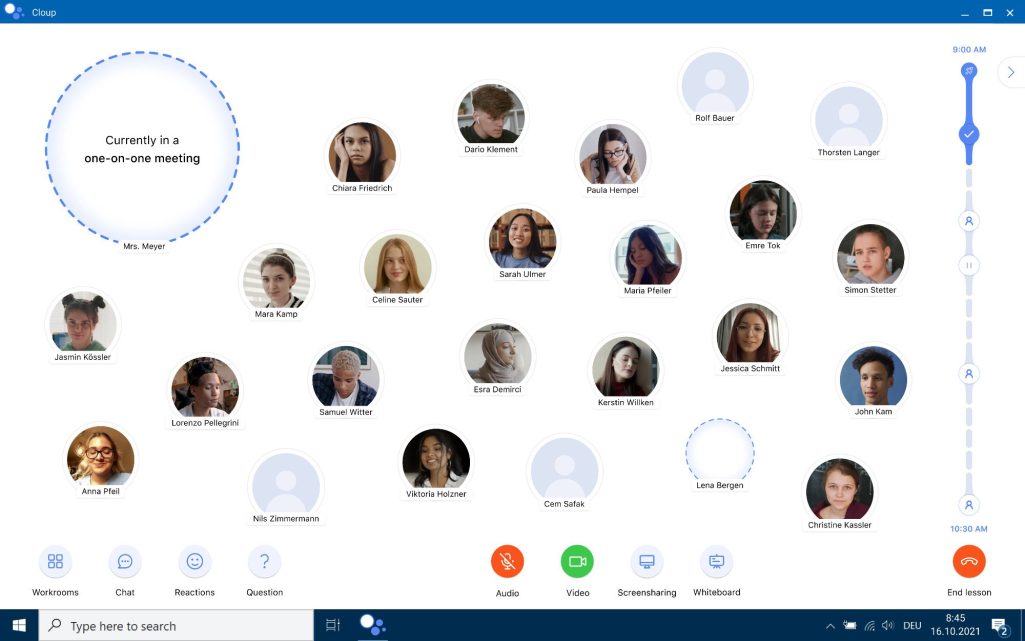
During the one-on-one conversation, the videos of the teacher and student are no longer visible to the other students.
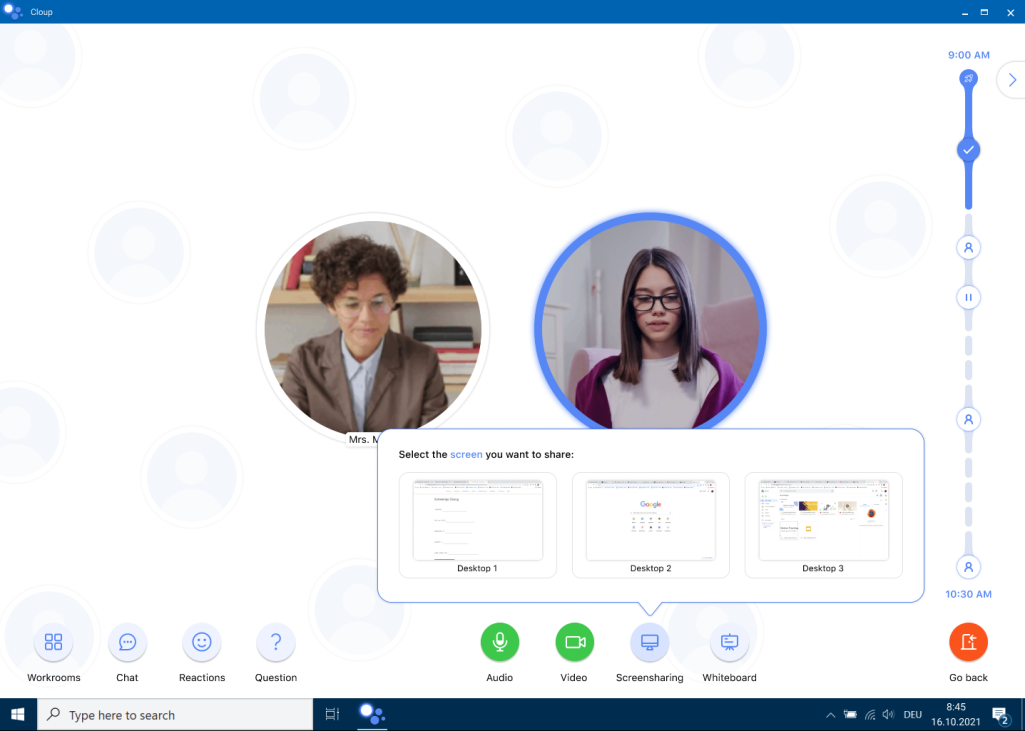
Lena now shares her screen with the teacher. They discuss the question together and then return to the lesson.
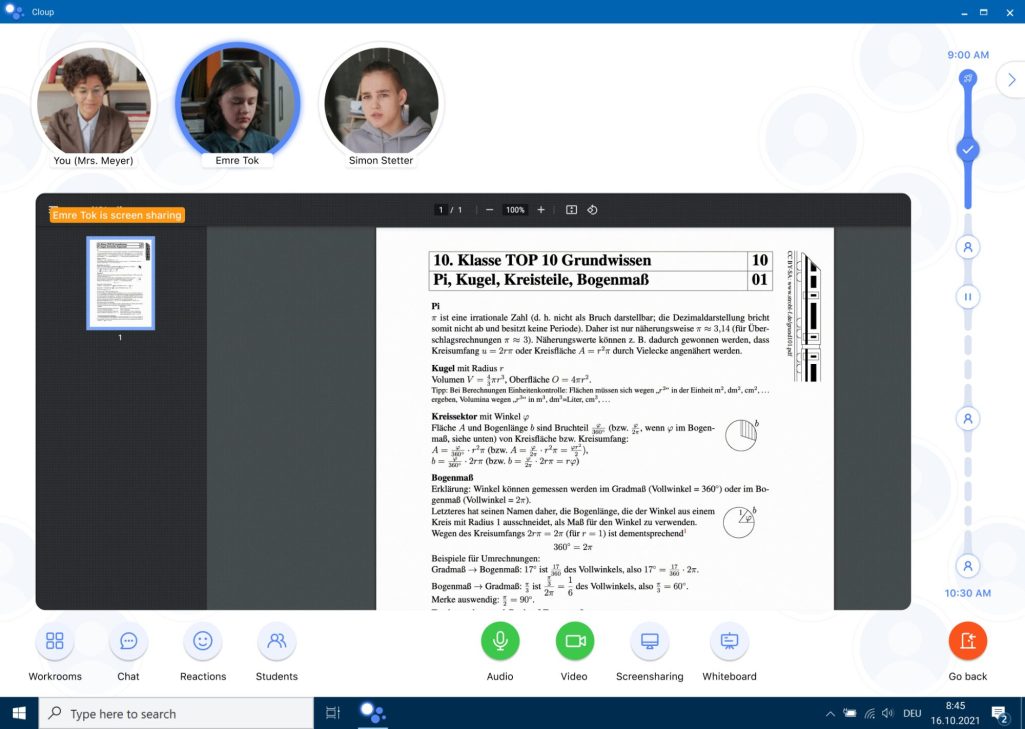
Individual support in groups
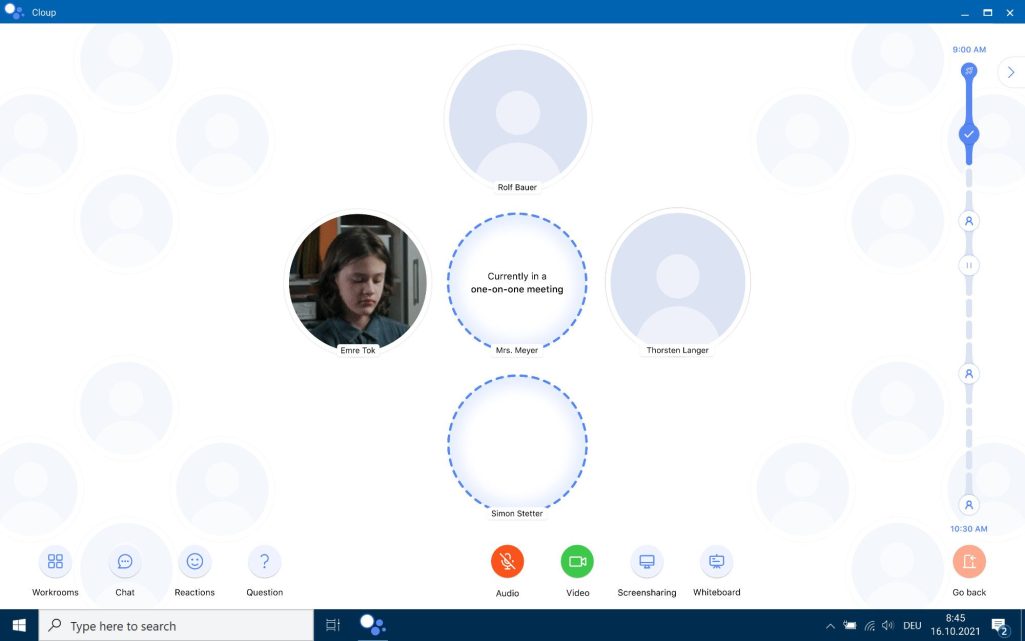
The student is assigned to their group where they can only see themselves and their group members. For questions, the student can choose between an individual question or a group question.
The teacher starts the individual discussion with Simon. While the student is in the one-on-one conversation with the teacher, their videos are hidden from the other group members.
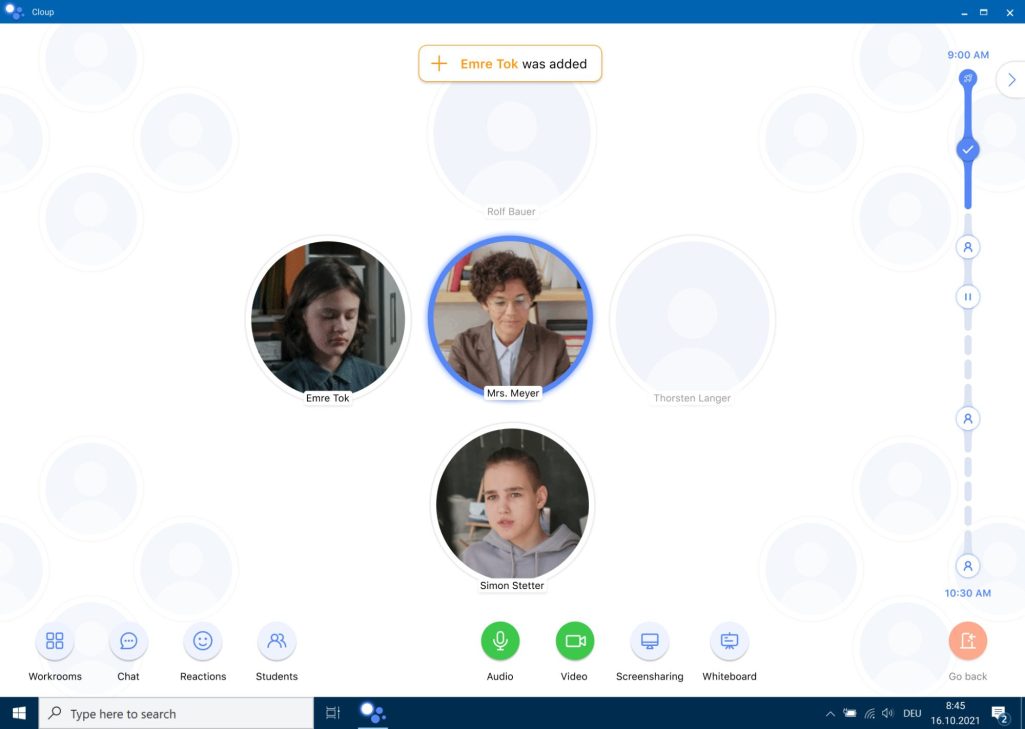
The teacher includes Emre in the one-on-one conversation. Emre shares his screen and the two students discuss the task with the teacher.
Climate conducive learning atmosphere
Students are assigned to their group and can only see themselves and their group members. The teacher listens to the group and talks to them. The students answer him.
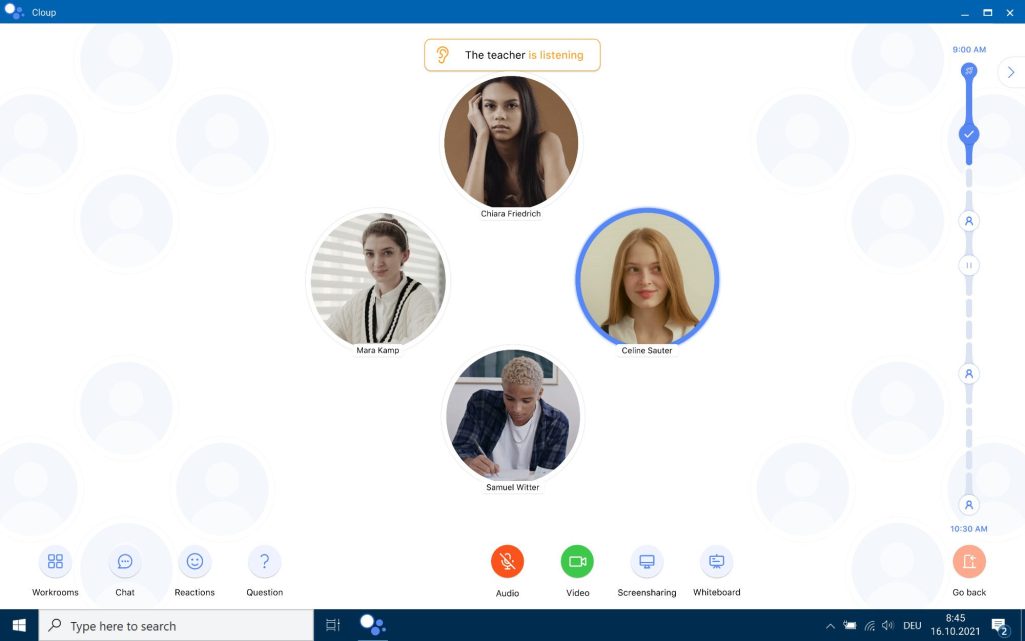
The teacher joins the group, but must wait five seconds before entering. The students receive a visual countdown and an acoustic notification that the teacher is about to join.

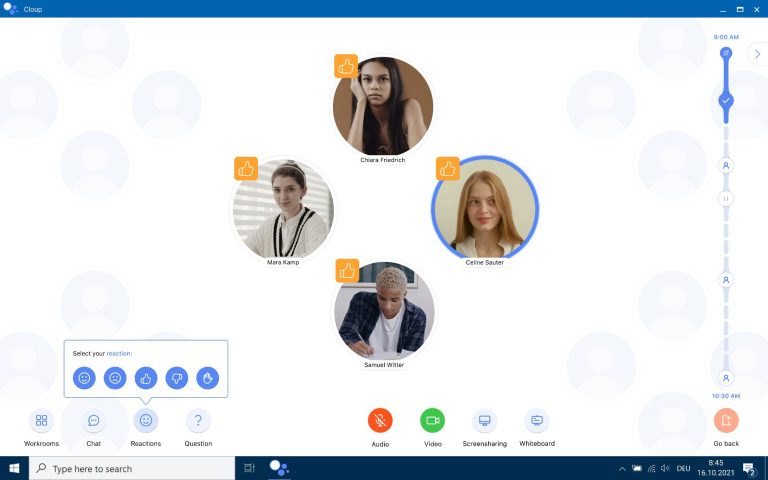
After leaving the group, the teacher speaks to all the students, who respond with reactions.
The teacher then asks the students in the chat to vote on the statement that is most fitting in their opinion. The students click on the corresponding message and give it a Like..
Design and visual appearance
We developed a design system for our final prototype. The individual elements such as icons, timeline elements and notifications have evolved over the course of the various iterations.
Generally, we design our screens using the atomic design method, in which we define the individual elements, create functional components and build our user interface.
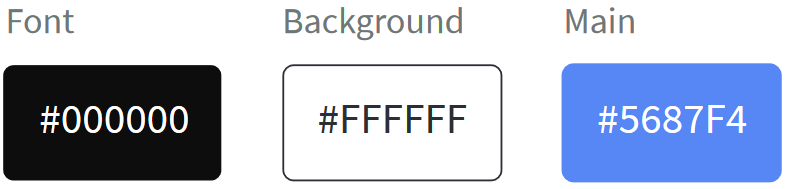
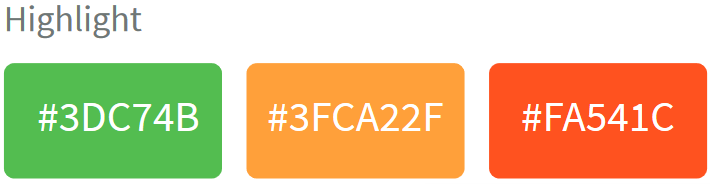
Color
We chose the following color scheme; our main colors are white and bold blue. We used bold accent colors for elements that should stand out from the rest.
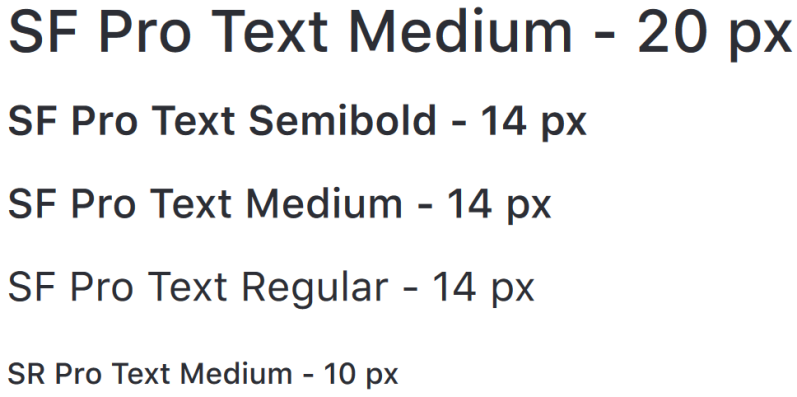
Typography
For the typography, we chose the SF Pro Text typeface. This font is very legible on digital media and has a professional and timeless look.
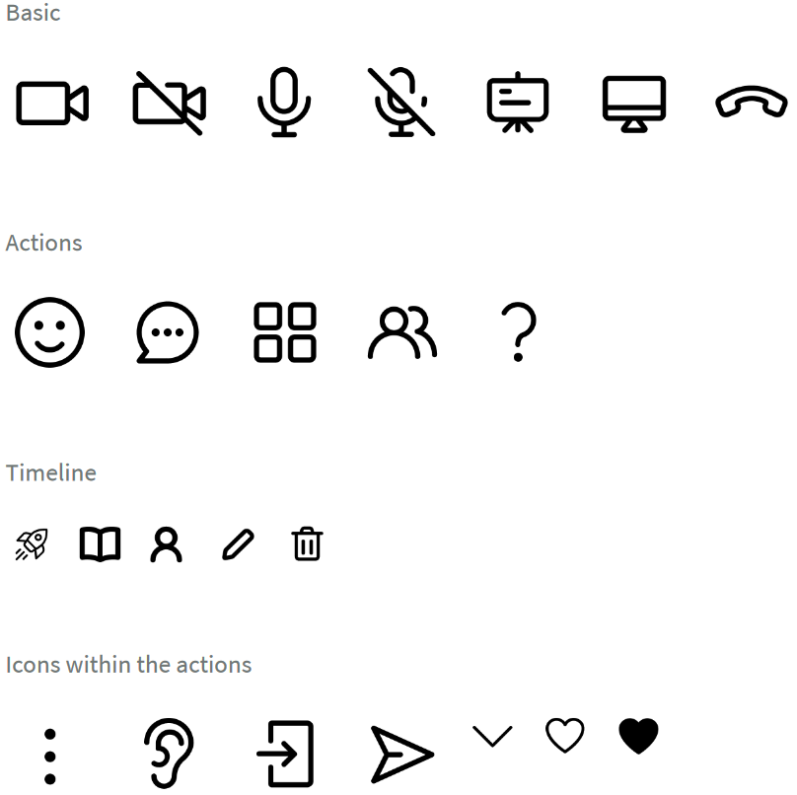
Icons
For the icons we use the icon grid of Material Design. We use the keylines
of the grid to define the structure of the symbol. It should be noted that both, the grid and the symbol located inside, must be scaled according to the required size.
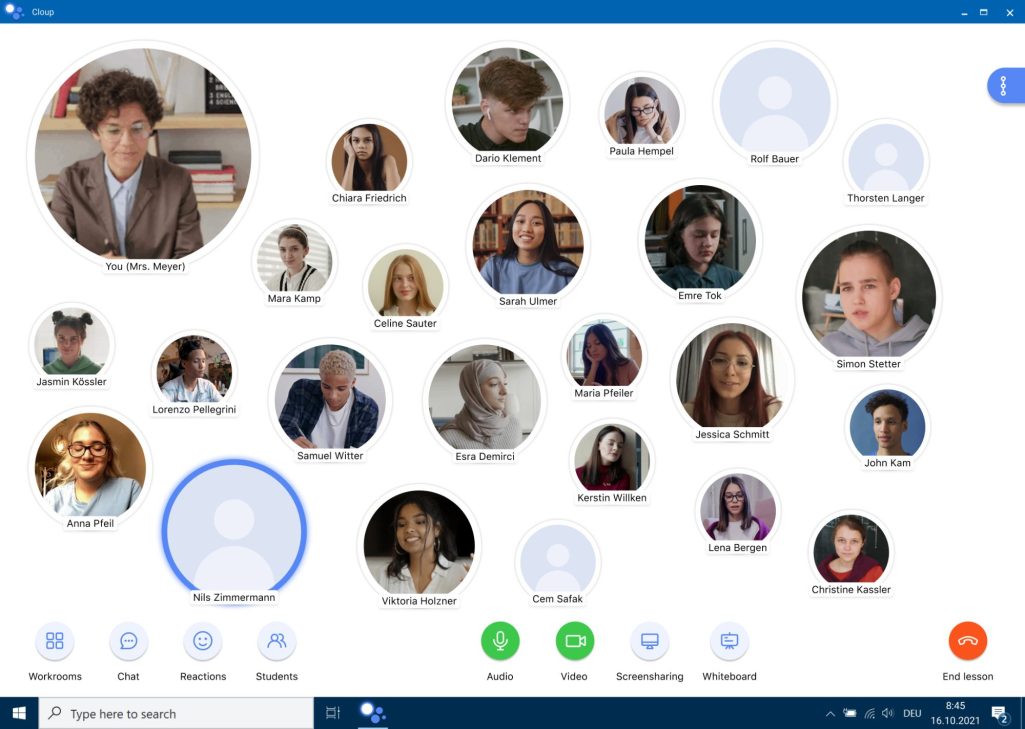
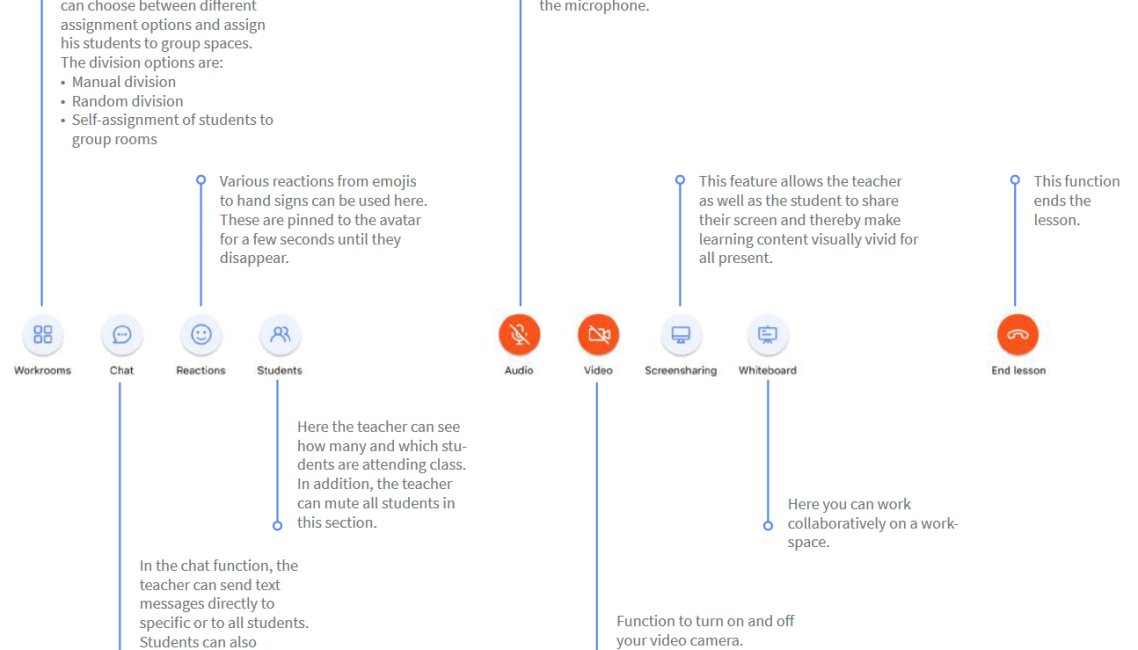
Teachers’ bottom navigation bar
The bottom navigation bar of the teacher consists of a total of 9 buttons. Each button has its own function. The typography combined with the icon inside the button should make the functions self-explanatory.

Students’ bottom navigation bar
Most of the lower student navigation bar functions are the same as on the teacher page, except for the "Student" function. The Question function replaces this button.
Button functions
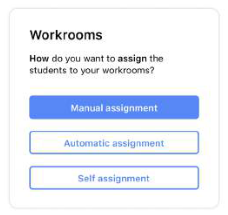
Workrooms
Here the teacher can set up workspaces where students can collaborate in groups without interruption from others. The teacher must first select what type of assignment he prefers.
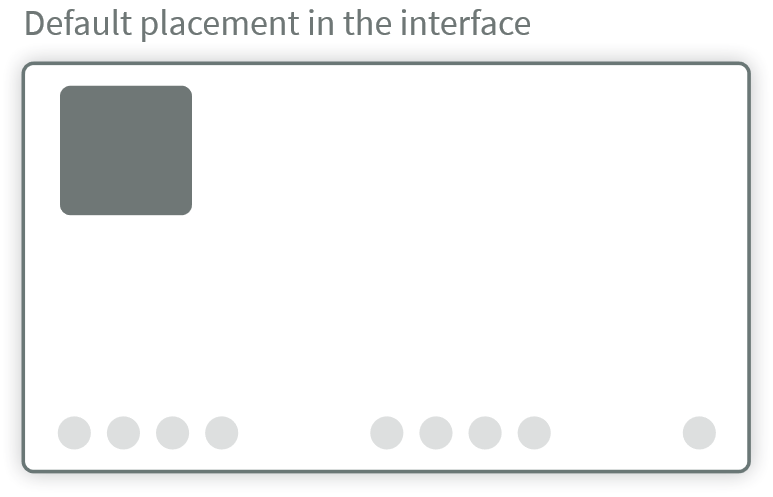
Chat
All participants can send messages into the chat and determine who can see the message. Furthermore, messages can be liked.
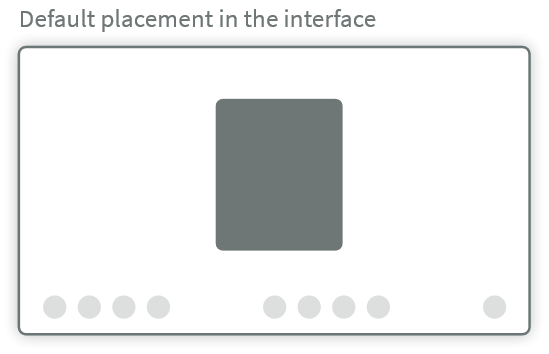
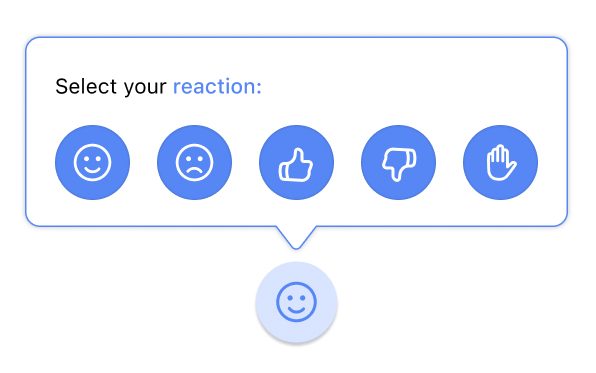
Reactions
Reactions allow students to respond to the teacher's questions or give quick feedback.
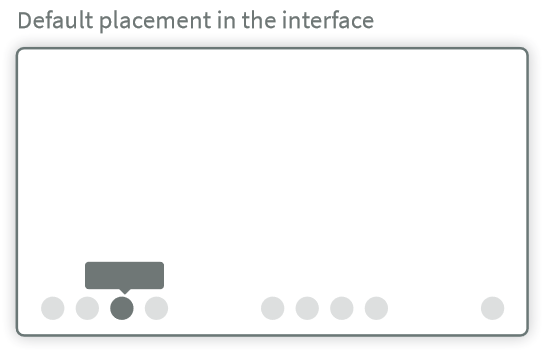
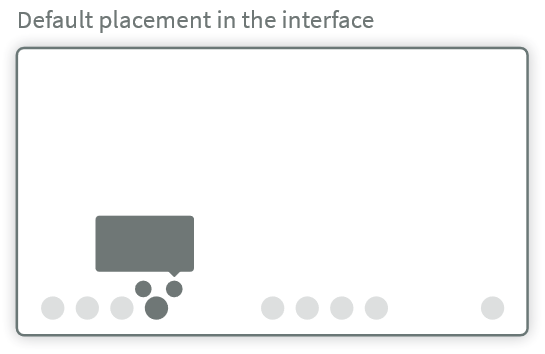
Question
Here, students are able to ask for help, alone or in a group.
Timeline
The timeline within the class and group work phases is intended to support better time management and structuring of an online lesson. It is important to note that only the teacher is able to customize and edit the timeline.
The timeline serves as a better visual representation of each lesson phase and allows students to prepare for each work phase.
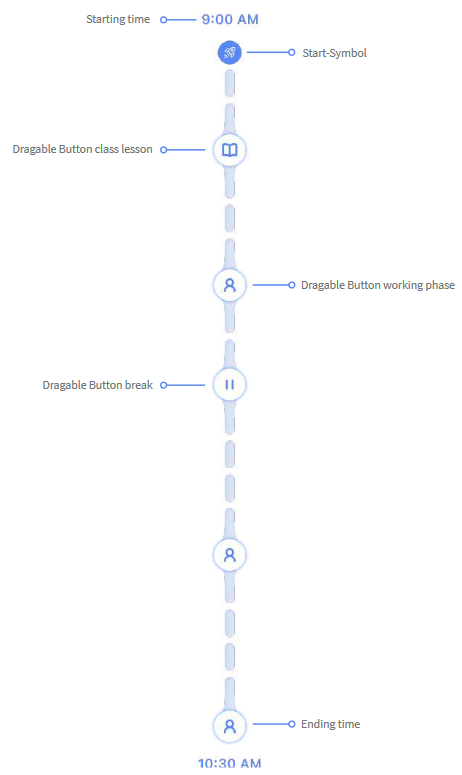
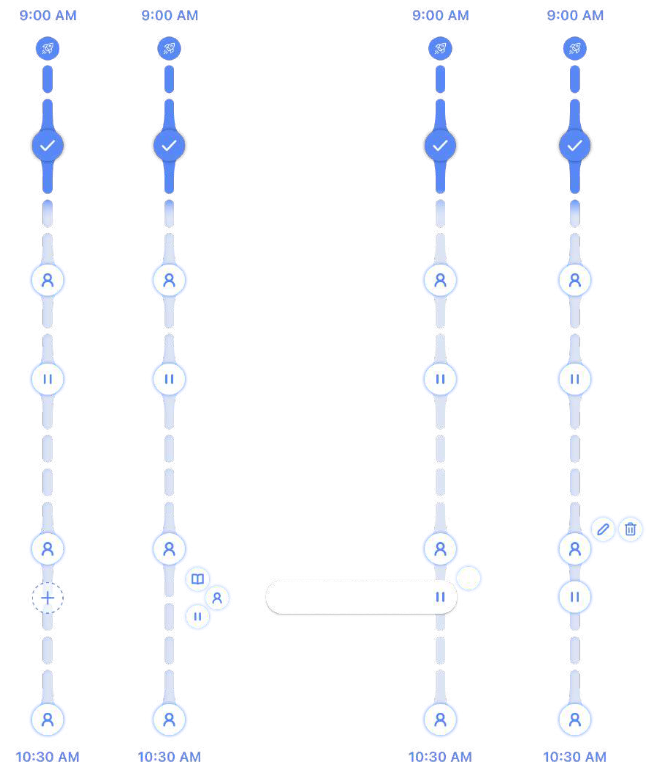
Structure
This is an example of how the timeline could look like when the lesson starts.
Add and edit phases
To add a phase, the user hovers over the timeline, which shows a dashed slider with a plus symbol.
When the user clicks on the plus icon, three options of teaching phases
appear.
If the user selects the break icon, for instance, he can enter a short description in the provided field.
By clicking on a slider, the user can edit or even delete the phase.
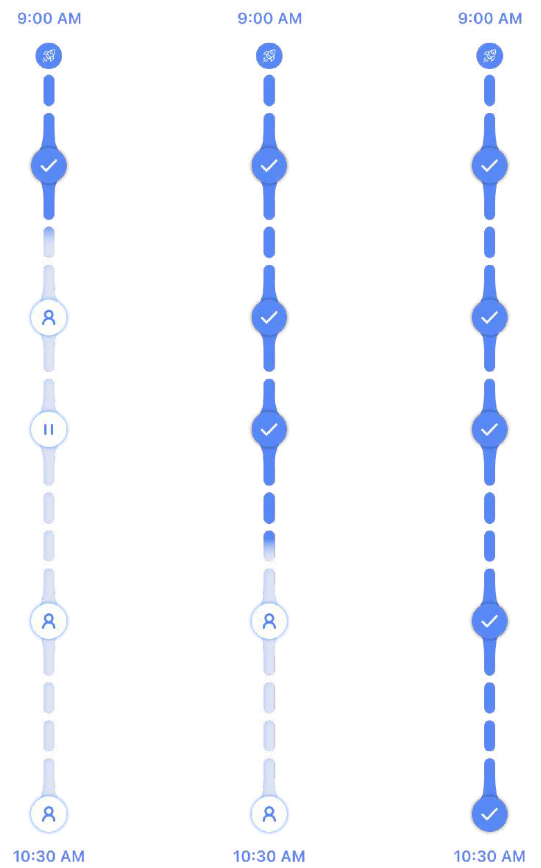
Progress
After starting the online lesson, the timeline fills with our blue color to visually highlight where you are in the timeline of the lesson.
The timeline consists of several sliders that only the teacher is allowed to move or edit.
When a phase is over, the slider turns blue, and a check mark icon indicates the end of the phase. When the icon changes color, and the phase is finished, the slider can no longer be moved.
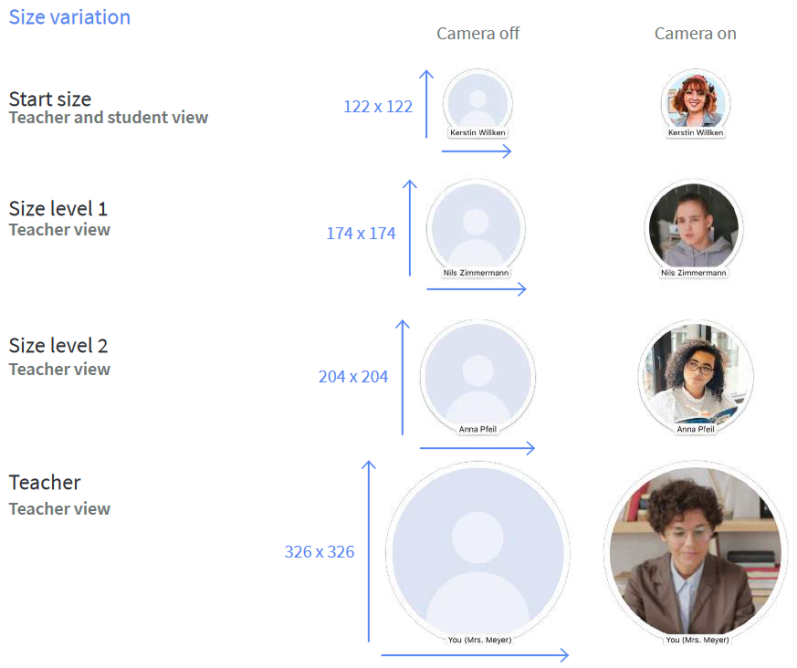
Avatars
There are two types of avatars: The student and teacher avatar. The teacher's avatar is always the largest, so the focus during the lesson is on
the teacher.
In frontal teaching, students are visually enlarged depending on how often they participate in the lesson. It is important to note that the magnified view of the avatars is visible only to the teacher and does not appear on the students' screen. The first and last names are displayed below the avatar/video.
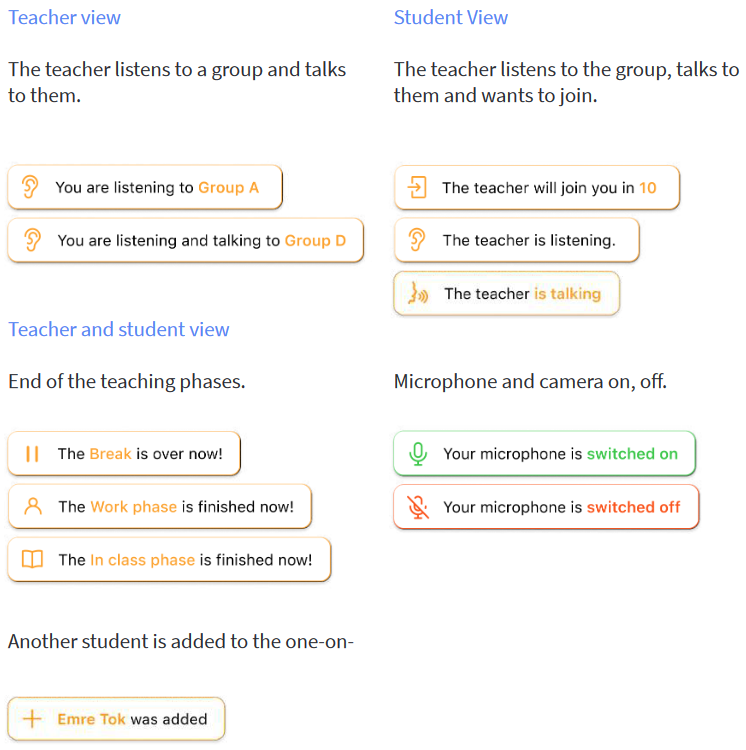
There are three different views for notifications. Some are received only by the teacher, others only by the students.
However, there are also notifications that both receive. Short pregnant sounds support the notifications. Each notification has its unique sound.
Notifications
Logo
Every application needs a suitable logo. For this reason, we create a word-image brand that fits our product. After several drafts with different colors and organic shapes, the following logo was created, showing the different sizes of students in frontal lessons from the teacher's perspective. The largest circle represents the teacher. The teacher has the blue ring representing the speaker in our interface. We use the SF Pro Text font in medium for the word-image mark. The word "Cloup" is a combination of the words class and group, as the product is designed for both frontal teaching with the whole class and group work.
The tagline "The new virtual learning environment" is placed below the word-image mark. This is displayed in SF Pro Text Light.

Final logo

Previous logo ideas


©Urheberrecht. Alle Rechte vorbehalten.
Wir benötigen Ihre Zustimmung zum Laden der Übersetzungen
Wir nutzen einen Drittanbieter-Service, um den Inhalt der Website zu übersetzen, der möglicherweise Daten über Ihre Aktivitäten sammelt. Bitte überprüfen Sie die Details in der Datenschutzerklärung und akzeptieren Sie den Dienst, um die Übersetzungen zu sehen.